Fundamentals in Repotting Snake Plants – Beginners Guide
Repotting snake plants may sound like an intimidating task, especially if this is your first attempt at the task. However, it doesn’t have to be if you have the right tools and equipment and, most importantly, the right guide.
We encourage all novice gardeners to embrace the process of repotting. The benefits of repotting are huge for snake plants, like refreshing the potting mix for nutrients, adding stability to the soil and water absorption properties. It also gives you an opportunity to examine your snake plant’s root system – something that is easy to overlook when everything seems okay above the soil. After we step you through the process of repotting your snake plant in this guide, you’ll wonder why you felt so daunted in the first place.
Welcome to today’s feature article at the Garden Bench Top. Today, we’re going to be learning about everything that you need to know about repotting snake plants (Sansevieria Trifasciata). We’ll cover:
- how to set yourself up for success with the right soil and pot sizes,
- how to examine your plant for any diseases and pests,
- and most importantly, the process of repotting and after care.
So go grab your gardening gloves, because we’re about to get our hands dirty!
Preparation for Repotting Snake Plants
Before we jump into repotting your snake plant, there are a couple of considerations to work through before you should upend any of your plants.
Correct Pot Size

Usually selecting a pot for your indoor plant is quite an easy process that doesn’t require more than a moment’s thought. However, for snake plants, there are a few additional considerations to make that will save a lot of frustrations and heart-ache in the future.
The issue with snake plants is that they are quite tall indoor houseplants, and can become top-heavy. If you choose a pot that doesn’t allow for your snake plant room to grow vertically, you will end up with a house plant that continually topples over.
You may be thinking there is an easy solution to this dilemma – why don’t we just put our snake plant in a overly large pot?
The problem here is that in order to keep your soil moist enough for your snake plant, you will have to top up more and more water. The excess water in the soil can attract unwanted diseases, like root rot and pests.
So what is the best pot size for your snake plant?
We recommend using a pot whose width is approximately two-thirds the size of your snake plant’s height. We also recommend using a pot that is made from a heavy organic material like terracotta or cement. The additional weight will act as a counter-balance for the top-heaviness of your snake plant.
One final thing to check with your new pot is that it has plenty of drainage holes for excess water to escape.
Best Soil Types

Being a member of the succulent family, snake plants (from the sansevieria genus) love soil that has a loam consistency, which is light and airy. This allows for the necessary gas exchange the sansevieria’s root system requires, like oxygen.
Loam soils are also known for their excellent drainage properties, which is one of the most important attributes for a snake plant’s soil to possess.
We also like to include a portion of naturally decomposed organic matter to supply all the necessary nutrients and minerals that your plant requires for healthy growth. We like to use homemade compost or worm castings from our DIY worm farms.
For a detailed recipe and instructional guide for making your own snake plant soil, jump on over to our article BEST SOIL FOR SNAKE PLANTS.
Clean Your Tools
Before we repot any of our beautiful houseplants, we always make sure to sterilize the equipment with rubbing alcohol. This includes sterilizing the pot that we are about to use for repotting our snake plant.
The reason we insist on sterilizing everything is to ensure there are no nasty surprises after we finish the process, such as root rot.
Root rot is a disease that can be spread by touching and sharing infected tools and surfaces. For example, if the new pot was used to accommodate an infected plant, it is likely the infection will carry into the soil of your snake plant.
And believe us when we say, this is not a disease you want to be dealing with.
If you are looking for a rubbing alcohol specific for gardening purposes, we use this one from Amazon.
How To Repot A Snake Plant – Step-By-Step
Okay, now we are prepped with everything ready to go.
Let’s get our hands dirty!

Materials You Will Need:
- potting soil for snake plant (refer above for recipe)
- new pot that accommodates for snake plant height (refer to preparation notes above)
- trowel or small spade
- medium-sized pebbles
1. Remove Your Snake Plant from the Old Pot
Removing a plant from its pot for the first time can be intimidating. To help first-timers here is a quick step guide for you to follow:
- If your current pot is made from plastic, gently squeeze the sides of the container to loosen the plant from the pot. If your plant is in a ceramic or solid pot, you can skip this step.
- Spread your hand over the surface of the potting soil. We like to support the leaves of the snake plant snugly between our fingers, to provide support to the plant.
- In a smooth swift action, tip the pot upside down. You’ll feel some topsoil fall down, which is to be expected. Your snake plant will likely still be sticking to the pot.
- Gently coax the plant out of its pot but shimmying it out of its home. As the plant comes out, you should begin to feel the weight of the plant on your support hand.
- Remove the root ball from the pot, and you have successfully extracted your snake plant.
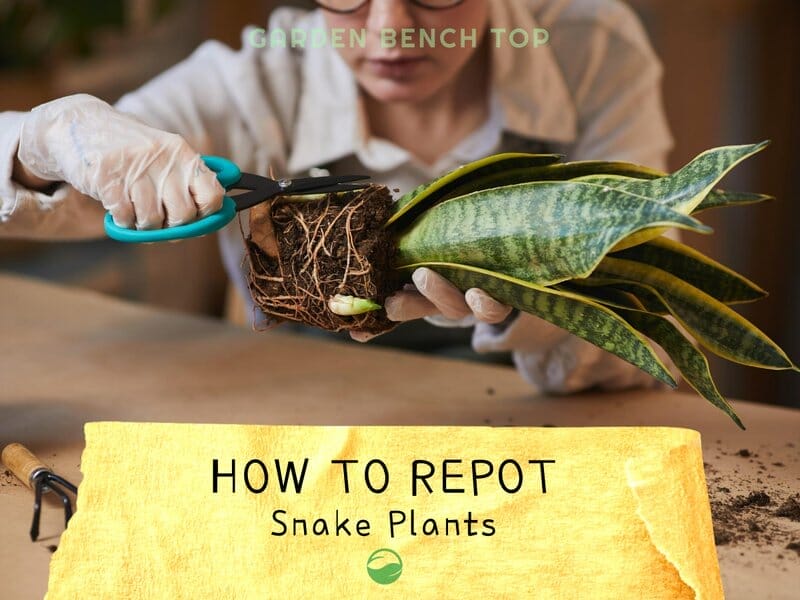
2. Inspect The Root Mass
It isn’t often that you will be repotting a snake plant, so we like to take this opportunity to inspect a snake plant’s root ball for any issues or signs of rot.
Gently loosen any garden soil that is clinging to the roots and thoroughly examine the condition of the roots. They should all appear an off-white color, firm to the touch and healthy.
Rotting roots generally look dark brown or black, and are mushy roots that can smell rotten.
If you spot any areas that look suspect, we encourage you to refer to our in depth article on snake plant root rot.
Look for Any Baby Snake Plants
While you are inspecting the root ball, you may come across some rhizomes that have baby snake plants beginning to pop out.
This is a good time to remove them and set aside for propagation. The reason we remove them, rather than allowing them to grow with the mother plant, is because they will form new plants, which will overcrowd and compete with the original plant for water and nutrients.
When removing the baby snake plants, ensure the rhizome has plenty of roots to sustain itself when you go to propagate them.
Fill Your New Pot with Soil
It is now time to turn our attention to the new pot. We like to lay down a layer of pebbles at the bottom of the pot to prevent soil from clogging up the drainage holes. It also helps to prevent any residue water from being wicked up by the soil from the ground.
Fill the pot up two-thirds of the way with the soil you have prepared (or purchased).
Create a mound of soil in the center of the pot. We like to do this, so the roots can be evenly spread out over all sides of the mound. It also helps to prevent the root system from becoming entangled.
Position Snake Plant
As mentioned, splay the roots out over the mound of soil you created in the center of your pot. While holding the snake plant with one hand, use the other to backfill the remainder of the pot with soil.
Make sure to keep the snake plant’s crown above the soil level and avoid it being covered. If soil covers the crown, it will encourage rot and disease to develop, which generally ends up in catastrophe.
The final task is to gently pat down the soil to stabilize your snake plant. And give your plant lots of water to help it settle into its new home.
Congratulations – you have successfully finished repotting your snake plant.
TOP TIP
While watering your newly repotted snake plant, check that the excess water drains out of the holes freely.
Snake Plant Care After Repotting

Once you have settled your newly potted snake plant, the best thing you can do is to place them back in their original position, with bright indirect light.
In doing so, it should help them settle, and quickly re-establish their root system in the new soil.
Since you have already given your snake plant a healthy watering, you won’t need to top it up for a few weeks – especially if you used fresh soil in the new pot.
That said, we suggest continuing to monitor the moisture levels using the finger test or a moisture meter.
Water is a key ingredient for overcoming transplant shock, and is the most important element you’ll need to supply to your repotted snake plant.
Frequently Asked Questions for Repotting Snake Plants
Should I Water A Snake Plant After Repotting?
Yes – you should water your snake plant immediately after you have completed the repotting process.
Your plant will experience a degree of transplant shock, and water will help it to settle into its new home.
Provide it with a healthy watering, until the excess water drains out of the drainage holes.
Place it back in its original position, and monitor the moisture levels of the soil. Wait until the soil is just dry, before adding more water.
Do You Need to Fertilize?
We like to fertilize our snake plants just before the growing season begins. This is usually in late winter or early spring.
This is about the same time we like to repot our snake plants, which makes it convenient to repot and feed your snake plant at the same time.
You can use all-purpose fertilizer, a succulent fertilizer or even a 20-20-20 fertilizer for snake plants. They are not particular about the types of fertilizer, as long as they receive the core ingredients, potassium, nitrogen, phosphorus and magnesium.
Do I need to Repot a Snake Plant with Root Rot
Root rot is a crippling disease that will kill your snake plant if not treated promptly.
The only way to treat and eliminate root rot from your snake plant is to repot and treat it with a fungicide.
What’s Next?
Repotting a snake plant doesn’t have to be a tedious task.
By using this easy-to-follow guide, you will have your snake plant settled into a new home in no time.
Be sure to read the preparation notes above to help you achieve a successful outcome.