How to Grow Bean Sprouts Without Growing Mold Instead

If you want to grow bean sprouts at home, there is one mistake that can ruin the whole batch fast. I know because I made it myself.
I had two trays of mung bean sprouts going side by side. Same room, same few days, same bag of beans. One tray turned out perfect. Crisp, fresh-smelling, white shoots. The other tray became a full-blown science experiment with black fuzzy mold, sour smell, and browning shoots.
That kind of side-by-side failure is actually useful, because it makes the real problem obvious. The issue was not the beans. It was not bad luck. It was not that sprouting is hard. The difference came down to one thing:
balance.
To grow bean sprouts successfully, you need moisture for germination, but you also need airflow for healthy growth. I thought I was helping by giving the sprouts extra warmth and constant humidity. What I actually built was a mold incubator.
What went wrong in my sprouting setup
The tray itself was a pretty standard setup. I used a hydroponic tray with a colander insert sitting inside a solid metal base. That part was fine.
The trouble came from three choices:
I put a heating pad underneath the tray.
I covered the top with a damp, heavy tea towel.
I kept that towel wet because I thought constant humidity would help.
On paper, it sounded like good plant care. Warmth, moisture, protection. But sprouts are not asking for a tropical swamp.
When you grow bean sprouts, overdoing the care can be worse than underdoing it. More heat, more water, and more covering do not automatically mean better growth. With sprouts, too much of all three can suffocate the batch.
The simple science I ignored
Sprouting beans are alive and active. Once they wake up, they are respiring. That means they are using oxygen and producing carbon dioxide and a little warmth.
So even before I added any help, the beans were already creating their own humid microclimate.
Then I added a heat pad underneath the tray, which pushed the temperature up even more. On top of that, I sealed the whole thing under a wet cloth. That trapped moisture, trapped warmth, and trapped the air the beans were giving off.
The result was stagnant, warm, humid air with almost no movement.
That is not an ideal environment to grow bean sprouts. It is a five-star resort for mold spores, which are already floating around in the air and just waiting for the right conditions.
Why the other tray succeeded
The successful tray was almost identical except for two important differences:
No heating pad
A loose kitchen paper towel instead of a thick tea towel
That change made all the difference.
Without the extra heat, the tray stayed cooler. The paper towel held enough moisture to stop the surface from drying out, but because it was thin and porous, it still allowed a gentle exchange of air. Warmth and carbon dioxide could escape instead of building up.
That is the balance you want when you grow bean sprouts:
Humidity for germination
Airflow for healthy growth
Miss that balance and the tray turns into a petri dish.
Root hairs or mold? How to tell the difference
One of the most confusing parts of sprouting is figuring out whether the fuzz on your beans is normal root hair or actual mold. That confusion stops a lot of people, so it helps to know what to check.
You only need two tools:
Your eyes
Your nose
What healthy root hairs look and smell like
Healthy root hairs are a clean, bright white. They look like a soft fuzzy halo attached directly to the root, especially along the white root tail.
If you touch them, they feel delicate rather than slimy. And the smell is fresh, earthy, and clean. It smells wet in a good way, not rotten.
This is the good fuzz.
What mold looks and smells like
Mold tends to spread beyond the root itself. You may see it on the seed hulls or even on the tray. The color is usually the biggest clue. Instead of brilliant white, mold often looks gray, green, or blackish.
The texture can be wet or slimy. And the smell gives it away quickly. If it smells sour, musty, rotten, or like damp old bread, something has gone bad.
That is not a batch you want to keep.
A quick check for suspicious fuzz
Color: white is usually good, gray green or black is bad
Smell: fresh and clean is good, sour and rotten is bad
Location: fuzz only on the root is usually normal, fuzz spreading onto hulls and tray points to mold
Can you save moldy bean sprouts?
Short answer: usually no.
Once true mold shows up, especially dark mold, the batch is basically lost. Those visible patches are releasing microscopic spores. You cannot simply rinse them off and expect the problem to disappear.
Trying to salvage a moldy tray often means the mold comes back stronger, and worse, you risk contaminating your equipment and the next batch too.
When that happens, the goal changes. You are no longer trying to save the sprouts. You are trying to save your setup and start clean.
The key principle that helps you grow bean sprouts successfully
If I had to boil the whole lesson down to one word, it would be this:
movement.
To grow bean sprouts without mold, you need air moving over and through the tray gently enough to carry away excess warmth and humidity.
Not wind. Not direct sun. Not drying them out. Just enough natural airflow so the tray does not become sealed and stagnant.
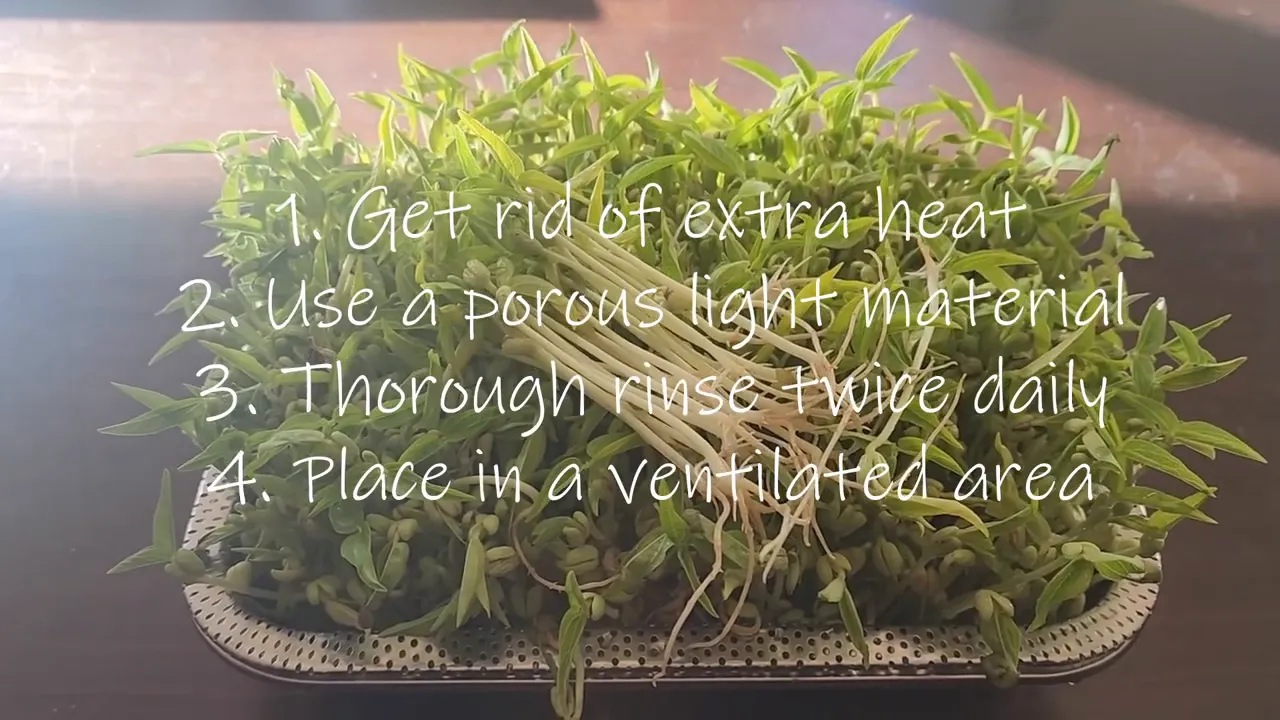
Four adjustments that fixed the problem
1. Lose the external heat
The first thing I did was unplug the heating pad.
Sprouts generate some warmth on their own through respiration. Adding external heat on top of that can easily push conditions too far, especially in an indoor setup.
The only time extra heat might make sense is if your house is genuinely cold. A simple rule of thumb works well here: if the room feels comfortable enough for a T-shirt, the beans are probably comfortable too.

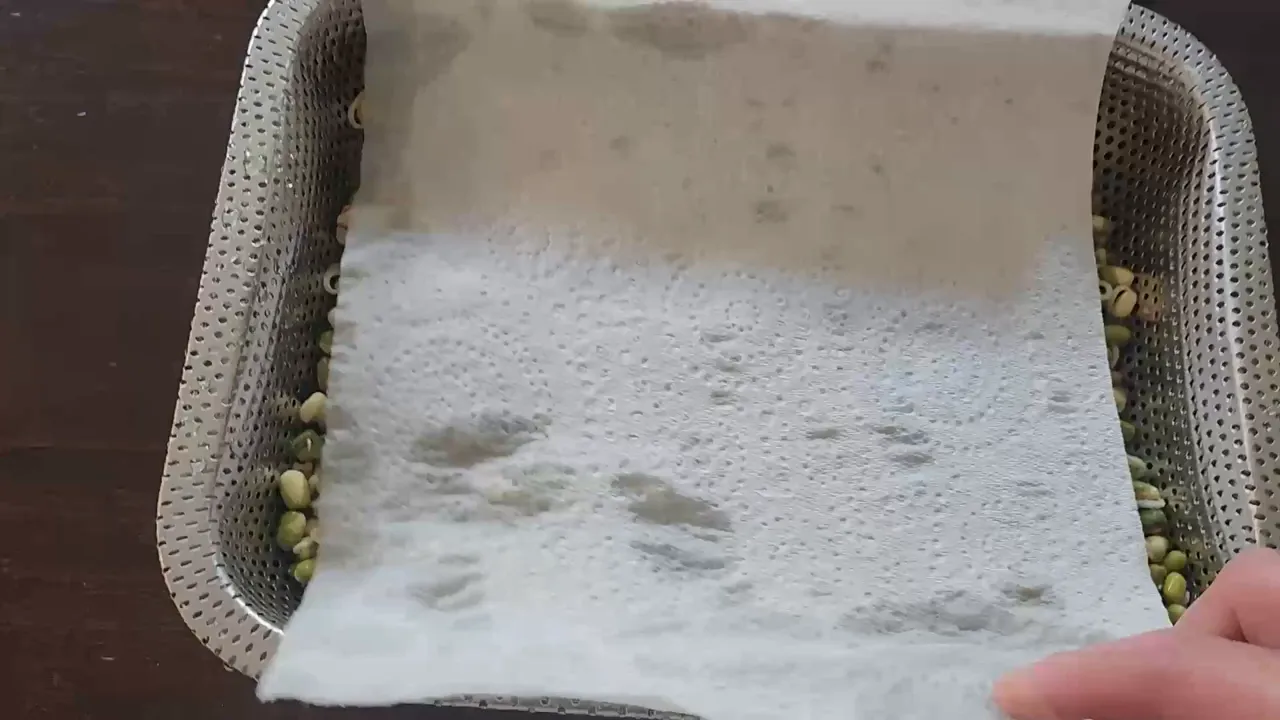
2. Change the covering
The second fix was replacing the thick wet tea towel with a single damp kitchen paper towel.
The heavy cloth acted like a lid. It held in stagnant air and kept everything too wet. The paper towel still protected the top layer from drying out, but because it was thinner and looser, it allowed humidity and carbon dioxide to escape gradually.
Think of it like this:
A thick wet towel is like putting a lid on a pot
A thin paper towel is more like draping a cloth over it
One traps everything. The other allows exchange.
3. Master the rinse and drain cycle
When you grow bean sprouts, rinsing matters, but the real key is not just how often you do it. It is how thoroughly you do it.
Do not just trickle water over the top and call it done. Get in there and give the tray a proper rinse so every bean and sprout gets washed. Then drain it well.

The important part is avoiding standing water in the colander section. A little water in the tray beneath can be fine, but the beans themselves should not be sitting in still water. That is exactly the kind of condition mold and rot love.
4. Pick a better location
The right place to keep the tray is cool, dark, and gently ventilated.
A kitchen cupboard can work well, but not if it is sealed shut. If you use a cupboard, leave the door cracked slightly so air can move in and out. You want darkness and stable conditions, not an airtight chamber.
A good setup means:
No direct sunlight
No strong gusts of wind
No sealed plastic bins or closed cabinets
Just the natural, slow movement of air in the home
If your current batch is moldy, start over
If you are staring at a moldy tray right now, the honest answer is to dump it and begin again.
It is tempting to pick out the bad bits and hope for the best. That is a risk not worth taking. The visible mold is only part of the story. Invisible spores may already be clinging to the tray and surrounding equipment, ready to wreck the next round too.
The good news is that mung beans grow fast. If you clean up properly and reset your method, your next chance at success is only about three to four days away.
The takeaway for anyone trying to grow bean sprouts
If you want to grow bean sprouts reliably, stop trying to lock humidity in at all costs.
Instead, build a setup that gives you both moisture and airflow.
Before your next rinse, check your tray and ask:
Is the cover breathable?
Is the tray too warm?
Is water pooling anywhere?
Is the sprouting area cool, dark, and lightly ventilated?
Fix the air, and the sprouts usually follow.
That is the lesson I learned the hard way. I thought I was helping. I was actually creating perfect conditions for mold. Once I removed the extra heat, switched to a breathable cover, rinsed thoroughly, and gave the tray some airflow, the difference was night and day.
So if a batch has gone sideways, do not decide that you just cannot grow bean sprouts. You absolutely can. Sometimes the best progress comes from one ugly tray and a very clear mistake.